Confirm Your Country or Area
Please Confirm
Confirm your country to access relevant pricing, special offers, events, and contact information.
What are you looking for?
Licensing Software Upgrade
Category B—Upgrade to Ixia License Utility/ILU
Select here to go back to the August 12 Require Licensing Upgrade page.
We will continue to publish important new information on this page as it becomes available.
Select the type of license server that is used and the install location:
- My license server is on a/an:
- I am using:
Hardware Chassis or Environment running Windows
Versions at or lower than these require an update |
IxOS 9.10 / 9.12 / 9.14 / 9.15 / 9.16 / 9.20 (Patch 3) / 9.23 / 9.24 |
Versions at or higher than these include the update |
IxOS 9.20 (Patch 4) / 9.24 (Patch 1) / 9.27 / 9.30 |
The following steps apply to Windows license servers:
Steps to Upgrade your License Server:
1. Download the licensing upgrade .EXE file here.
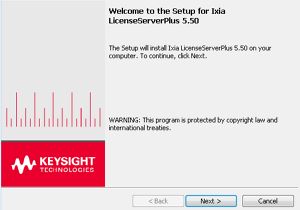
2. Start the License Server Plus 5.50 EXE installer.
3. Select Next.

4. Accept the License Agreement and select Next.


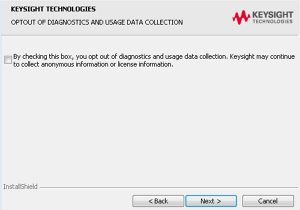
5. Opt-in or opt-out for licensing data collection and select Next.

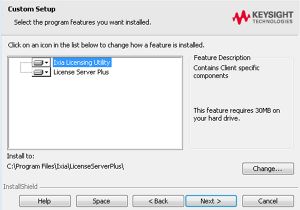
6. Select all components that you want to install and select Next.

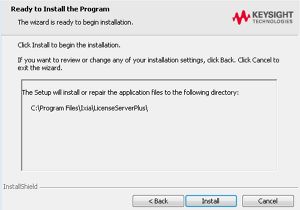
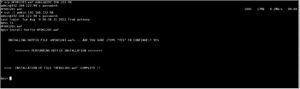
7. Select Install to start the installation process, which should take less than five minutes.

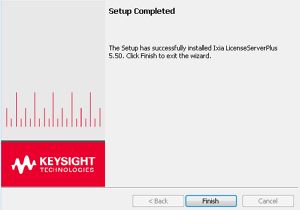
8. Select Finish and reboot the machine after the installation has been completed successfully.

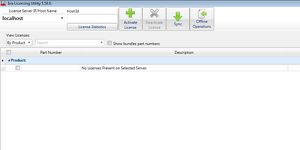
9. Start the Ixia Licensing Utility software and verify that the status bar shows version 5.50.

Hardware Chassis Running Native IxOS
Versions at or lower than these require an update |
IxOS 9.10 / 9.12 / 9.14 / 9.15 / 9.16 / 9.20 (Patch 3) / 9.23 / 9.24 |
Versions at or higher than these include the update |
IxOS 9.20 (Patch 4) / 9.24 (Patch 1) / 9.27 / 9.30 |
The following steps apply to license servers on Hardware Chassis running Native IxOS:
Steps to Upgrade your License Server:
1. Download the licensing upgrade WAF file here (MD5SUM: 3f569854f0b1d48d59243c0bc551df2b).
2. Sign in to the Chassis Web UI by using your credentials. The default credentials are admin / admin.
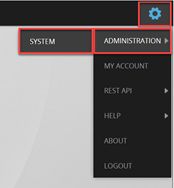
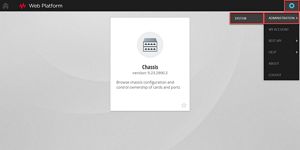
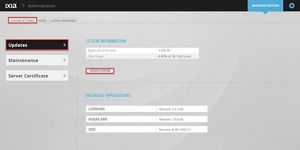
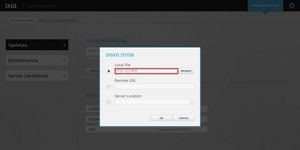
3. Select Settings > Administration > System.

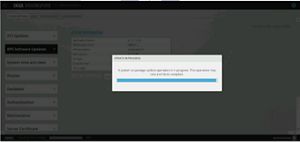
4. On the System Settings tab, select Updates, and then select Manual Updates.
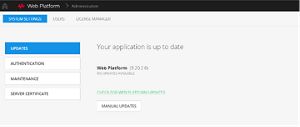

5. Select Local File, and then select Browse to choose the previously downloaded WAF file (views may differ again).
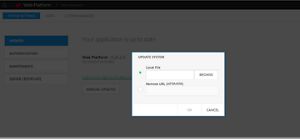

6. Select OK. This starts the update of the license server to the latest version.
7. After the license server installation is complete, reboot the Chassis.
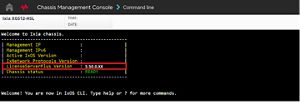
8. After the reboot, sign in to the Chassis Web UI, and then select CLI.
9. Verify that the License Server Plus Version has been changed to 5.50.

The license server that is embedded inside the Chassis is now ready to use.
Virtual Chassis
Versions at or lower than these require an update |
IxOS 9.10 / 9.12 / 9.14 / 9.15 / 9.16 / 9.20 (Patch 3) / 9.23 / 9.24 |
Versions at or higher than these include the update |
IxOS 9.20 (Patch 4) / 9.24 (Patch 1) / 9.27 / 9.30 |
The following steps apply to license servers on Virtual Chassis:
Steps to Upgrade your License Server:
1. Download the licensing upgrade WAF file here (MD5SUM: 3f569854f0b1d48d59243c0bc551df2b).
2. Sign in to the Virtual Chassis Web UI by using your credentials. The default credentials are admin / admin.
3. Depending on the version installed, select Administration.


Or select Settings > Administration > System.

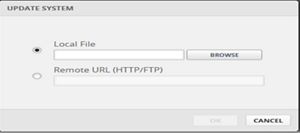
4. On the System Settings tab, select Updates, and then select Update System (again the view may look different).

Or


5. Select Local File, and then select Browse to choose the previously downloaded WAF file (views may differ again).

Or

6. Select OK. This starts the update of the license server to the latest version.
7. After the license server installation is complete, reboot the Virtual Chassis.
8. After the reboot, sign in to the Virtual Chassis or the Virtual Test Web UI, and then select CLI.
9. Verify that the License Server Plus Version has been changed to 5.50.
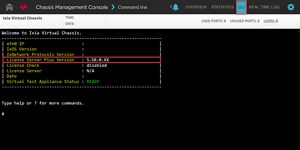

The license server that is embedded inside the Virtual Chassis is now ready to use.
Virtual Test Appliance
Versions at or lower than these require an update |
IxOS 9.10 / 9.12 / 9.14 / 9.15 / 9.16 / 9.20 (Patch 3) / 9.23 / 9.24 |
Versions at or higher than these include the update |
IxOS 9.20 (Patch 4) / 9.24 (Patch 1) / 9.27 / 9.30 |
The following steps apply to license servers on Virtual Test Appliance:
Steps to Upgrade your License Server:
1. Download the licensing upgrade WAF file here (MD5SUM: 3f569854f0b1d48d59243c0bc551df2b).
2. Sign in to the Virtual Test Appliance Web UI by using your credentials. The default credentials are admin / admin.
3. On the top right side, select Settings > Administration > System.
4. On the System Settings tab, select Updates, and then select Update System.
5. Select Local File, and then select Browse to choose the previously downloaded WAF file.
6. Select OK. This starts the update of the license server to the latest version.
7. After the license server installation is complete, reboot the Virtual Test Appliance.
8. After the reboot, sign in to the Virtual Test Appliance Web UI, and then select CLI.
9. Verify that the License Server Plus Version has been changed to 5.50.
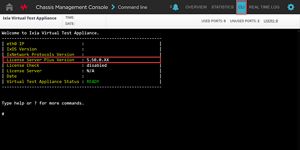

The license server that is embedded inside the Virtual Chassis is now ready to use.
BreakingPoint Virtual Controller
Versions at or lower than these require an update |
9.10 / 9.20 / 9.22 |
Versions at or higher than these include the update |
9.30 |
This category applies to the following products:
- BreakingPoint VE—version 9.22 or earlier
Steps to Upgrade your License Server:
- BPS VE versions 8.30 to 9.00—Contact Keysight Support to get help on upgrading the License Server on your system or please use the Offline Operations mode for activation and deactivation of licenses. To contact Support, call +1 818 595 2599 for Ixia Global Support or send an email to support.ix@keysight.com. You can find local phone numbers and a form to complete to open a support case here.
- BPS versions 9.10 to 9.22—Perform the following steps to update the License Server from your system yourself.
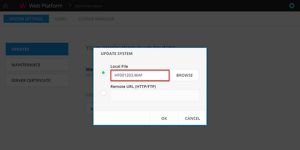
1. Download the licensing upgrade .bps file here (MD5SUM: 190133b5621e0a3df813a10f7e858496).
2. Download the licensing upgrade WAF file here (MD5SUM: 3f569854f0b1d48d59243c0bc551df2b).
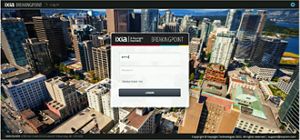
3. Sign in to the BreakingPoint Web UI by using the admin user credentials.

4. In the UI, select the Gear menu > Administration.
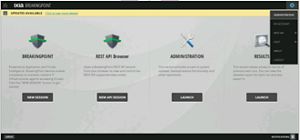

5. Select BPS Software Updates > Install Package.
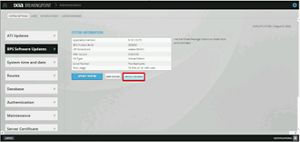

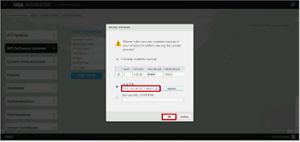
6. Select the check box to acknowledge that a backup of the current system has already been created.
7. Select Local File > Browse and choose the previously downloaded .bps file.
8. Select OK. This starts the preliminary step of preparing the system for the upcoming License Server upgrade.

9. Wait for the package to update.

10. Using SCP, copy the previously downloaded .waf file to the BreakingPoint System Controller.


11. After the .waf file has been copied to the BreakingPoint System Controller, open an SSH connection to the BreakingPoint System Controller CLI by using the admin user credentials.


12. Start the License Server upgrade process by entering the command install_hotfix HF001203.WAF. A prompt appears asking for your confirmation. Enter YES to confirm.

13. After the License Server installation is complete, reboot the Virtual Machine. The License Server that is embedded inside the Breaking Point System Controller is now ready to use.
TrafficREWIND
Versions at or lower than these require an update |
9.20 |
Versions at or higher than these include the update |
TBD |
This category applies to the following products:
- TrafficREWIND—version 9.20
If your TrafficREWIND version is lower than 9.20, upgrade to 9.20 from here.
For TrafficREWIND, the License Server is embedded inside the TrafficREWIND Controller or Appliance.
Steps to Upgrade your License Server:
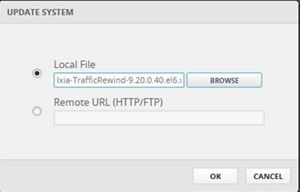
1. Download the licensing upgrade .waf file here (MD5SUM: e72ef150b1e0e1ecb6453c20a5789527).
2. Sign in to TrafficREWIND by using the admin account and select Administration.


3. In the Administration page, on the System Settings tab, select Manual Updates.
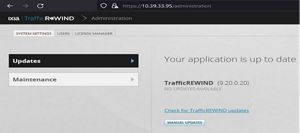

4. Select Browse and select the .waf file (downloaded at step 1), which is used to update the system with the new licensing changes.

5. Select OK to start the update process.

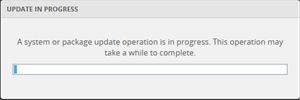
The update progress bar appears after the update starts. The appliance reboots after the update operation is complete.

After this stage, the license server that is embedded inside the TrafficREWIND Controller or Appliance is updated and ready to use.
IxNetwork Web Virtual Machine
Versions at or lower than these require an update |
IxNetwork Web 9.10 / 9.12 / 9.14 / 9.15 / 9.16 / 9.18 / 9.20 (Patch 1 / Update 1 / Update 2) / 9.23 / 9.24 |
Versions at or higher than these include the update |
IxNetwork Web 9.20 (Update 3) / 9.24 (Patch 1) / 9.27 / 9.30 |
This category applies to the following products:
- IxNetwork Web—version 9.24 or earlier
Steps to Upgrade your License Server:
1. Download the licensing upgrade .waf file here (MD5SUM: 3b237d3cf6f990853414cb9c6d1f18dd).
2. Sign in to the IxNetwork Web UI by using the admin user credentials.

3. In the UI, select the Gear menu > Administration.


4. Select Updates > Manual Updates.
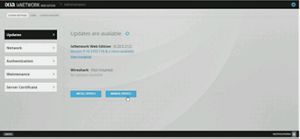

5. Wait for the package to update. After this stage, the license server that is embedded inside the IxNetwork Web is updated and ready to use.
SuiteStore
Versions at or lower than these require an update |
2.5 |
Versions at or higher than these include the update |
TBD |
This category applies to the following products:
- SuiteStore—version 2.5 or earlier
For the SuiteStore product, the instructions are the same as Cloud Peak.
IxChariot VM
Versions at or lower than these require an update |
9.6 SP2 Patch 1 |
Versions at or higher than these include the update |
9.6 SP2 Patch 2 |
The following steps apply to IxChariot VM:
Steps to Upgrade your License Server:
1. Download the licensing upgrade WAF file here (MD5SUM: e74dc974def7d026a5ea15b8ceee3232).
2. Sign in to IxChariot by using your credentials. The default credentials are admin / admin.
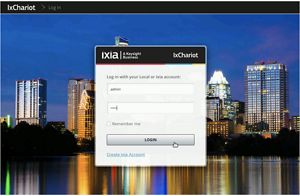

The IxChariot home page appears.


3. In the UI, select the Gear menu > Administration.
4. Select Updates > Manual Updates.
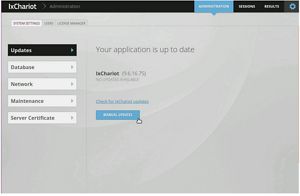

5. Select Local File, and then select Browse to choose the previously downloaded WAF file (views may differ again).
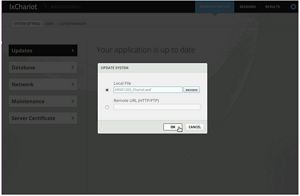

6. Select OK. This starts the update of the license server to the latest version.
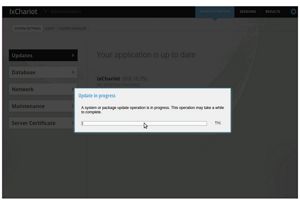

The license server that is embedded inside IxChariot is now ready to use.
IxANVL VM
Versions at or lower than these require an update |
9.32 |
Versions at or higher than these include the update |
9.33 |
This category applies to the following products:
- IxANVL VM—version 9.32 until version 9.0
Steps to Upgrade your License Server:
1. For IxANVL on Linux, download the following file (34e84722ec3393932f154af5ef203389).
2. If you are using a VM that is supplied by Keysight, please contact Support to aid in the installation of this package.
3. If you are using the fully supported CentOS 7.5/7.9 distribution, you can also use the embedded License Server (LicenseServerPlus).
4. To install this package, simply place the file on your system (SCP, FTP, HTTP), and then sign in and obtain root access.
5. Assuming your package is located in '/home/ixanvl/HF001203_ANVL_Linux.rpm' enter this command as root:
rpm -Uhv /home/ixanvl/HF001203_ANVL_Linux.rpm
You have now updated LicenseServerPlus to the required version post migration. If you are not using the fully supported CentOS 7.5/7.9 distribution, your License Server is most likely located on a Windows based server/PC. Follow the instructions at the top of this page for general instructions to install LicenseServerPlus 5.50 on Windows.
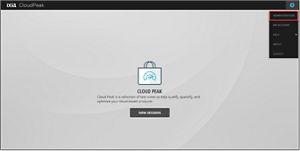
Cloud Peak
Versions at or lower than these require an update |
3.40 |
Versions at or higher than these include the update |
3.50 |
This category applies to the following products:
- Cloud Peak—version 3.40 or earlier
For the Cloud Peak product, the License Server is embedded inside the Cloud Peak Management Virtual Machine.
Steps to Upgrade your License Server:
If you currently have Cloud Peak installed, perform the following steps to upgrade your licensing software to the latest version:
1. Download the licensing upgrade WAF file here (MD5SUM: 2da533da5fd5c1ebe03aa260025a44f6).
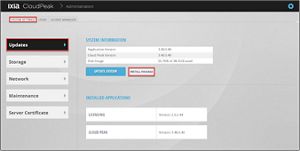
2. Sign in to the Cloud Peak Chassis Web UI by using your credentials. The default credentials are admin / admin.
3. On the top right side, select Settings > Administration.

4. On the System Settings tab, select Updates, and then select Install Package.

5. Select the check box to acknowledge that a backup of the current system has already been created.
6. Select Local File, and then select Browse to choose the previously downloaded WAF file.
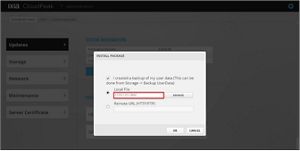

7. Select OK. This starts the update of the license server to the latest version.
8. After the license server installation is complete, reboot the Virtual Machine.
The license server that is embedded inside the Virtual Chassis is now ready to use.
CyPerf
Versions at or lower than these require an update |
1.6 |
Versions at or higher than these include the update |
1.7 |
This category applies to the following products:
- CyPerf—version 1.6 or earlier
For CyPerf, the License Server is embedded inside the CyPerf Controller.
Steps to Upgrade your License Server:
1. Download the licensing upgrade .tar file here (MD5 Checksum: c94cf11ee70acd338554026caa976564).
2. Sign in to the CyPerf Web UI by using the admin user credentials.
3. From the CyPerf UI, select the Gear menu > Administration > Software Updates.
4. Select the Select Packages for Upload button and select the previously downloaded .tar file.
a. While the Upload operation is in progress, the Start Update and Reset Current Changes buttons are unavailable.
b. The software update page will not highlight any packages as changing during the update, or after. This is as expected.
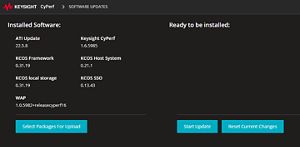

5. Select Start Update. A progress indicator appears.
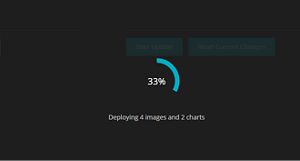

When the patch installation is complete, a notification in the lower-right corner is generated.


After this stage, the license server that is embedded inside the CyPerf Controller is updated and ready to use.
Need Assistance?
Please call +1 818 595 2599 for Ixia Global Support. Local phone numbers and template to open a Support case can be found here.
- © 是德科技 2000–2024
- 隐私
- 网站地图
- 条款
- 商标致谢
- 反馈
-
京ICP备20005161号
 京公网安备 11010502040140 号